Luxury Vinyl Plank Installation in the Inland Empire: What a Good Job Looks Like
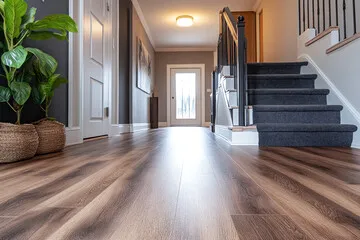
Luxury vinyl plank is the floor we install most after hardwood, and most of the failed LVP floors we are called to look at were not bad product. They were good product installed over a slab that was never checked, with no gap at the walls, in a room that gets the full afternoon sun.
Here is what a proper LVP installation looks like in an Inland Empire home, so you know what you are paying for.
The slab comes first
Nearly every home from San Bernardino to Corona sits on a concrete slab, and LVP is thin enough that whatever is under it shows through. Two things have to be true.
Flat. The standard is no more than 3/16 of an inch of variation over ten feet. High spots get ground down. Low spots get filled with a cement-based patch or self-leveling compound. A floating plank over a low spot flexes with every step, and a flexing joint eventually opens.
Dry. Vinyl is waterproof; the slab is not. Moisture vapor coming up through concrete breaks down adhesive under a glue-down floor and grows mold under a floating one. We test the slab before install and add a vapor barrier or a moisture-tolerant adhesive when the reading calls for it. Our post on hardwood over a concrete slab covers what Inland Empire slabs do and why.
Click-lock or glue-down
Most of our residential LVP jobs are click-lock floating: planks lock to each other and rest on the subfloor. It is fast, needs no adhesive, and can float over well-bonded existing tile, which saves a demolition day. Our click-lock vinyl plank guide covers the product.
Glue-down bonds the plank to the slab. We use it in high-moisture rooms, commercial spaces, and rooms where the floor will bake in direct sun, because a glued floor cannot expand as a unit. It needs a flatter, cleaner slab and a day for the adhesive to set before furniture goes back.
The Inland Empire detail: heat
This is the part that is specific to us. A rigid-core plank in front of a west-facing slider in Redlands or Fontana can reach temperatures in August that a floor in a coastal home never sees. Vinyl expands with heat. If it has nowhere to go, it peaks at the seams or lifts at the edges.
So on a floating floor we leave the full manufacturer expansion gap at every wall, cover it with baseboard or quarter round fastened to the wall and never through the floor, and add a T-molding on long runs where the product requires it. In sunrooms and rooms with big south or west glass, we often recommend glue-down instead, or a product rated for high heat, and we will say so at the estimate. Our waterproof LVP guide covers what to look for in the spec.
Acclimation
LVP needs less acclimation than wood but not none. The cartons sit in the room at normal living temperature for a day or two before install. Planks brought in from a hot truck in July and installed tight will shrink and gap when the air conditioning has been running for a month.
Transitions, jambs and stairs
Three small things separate a professional install from a rushed one:
- Undercut door jambs, so the plank slides beneath the casing instead of being cut around it.
- Clean transitions where LVP meets tile or carpet, level enough not to catch a toe.
- Stairs done properly, with matching stair nosings and treads glued, not floated. Stairs are priced separately because each step is hand work. Our stair installation page covers what that involves.
What you should expect on install day
Furniture moved, old floor removed if it is coming out, slab ground and patched, moisture checked, underlayment or barrier laid if the product needs it, layout planned so cuts fall where they should, planks laid with staggered end joints, then trim and transitions. A single room is a few hours. Most homes are one to three days. You can walk on a floating floor the moment we finish.
Installed LVP in the Inland Empire runs $4 to $9 per square foot depending on the product, the slab work and whether it is glued or floated. Our luxury vinyl plank installation page has the details.
The five shortcuts that cause failures
- Skipping the flatness check and installing over a wavy slab
- No moisture test on the concrete
- No expansion gap, or trim nailed through the floor
- Planks installed straight from a hot truck
- Wide grout lines left unfilled under a floor going over tile
If a quote is far below the others, one of these is usually why.
If a plank gets damaged later
One of LVP's genuine advantages is that a single damaged plank can be replaced without redoing the room, if the install was done right and you kept a spare carton. Our post on replacing a damaged vinyl plank explains how.
Still deciding whether LVP is the right floor? Our hardwood vs luxury vinyl plank guide is the honest comparison. When you are ready for a number, book a free estimate and we will check your slab and bring samples.
Frequently asked questions
- How long does LVP installation take?
- A single room takes a few hours and most Inland Empire homes are done in one to three days. Floating floors can be walked on immediately; glue-down needs about a day for the adhesive to set before furniture goes back.
- Can LVP go over existing tile?
- Yes, if the tile is well bonded and flat. Rigid-core click-lock LVP floats over it, saving a demolition day. Wide grout lines are filled first so they do not telegraph through the plank.
- Why does LVP buckle or gap in Inland Empire homes?
- Heat and missing gaps. Vinyl expands in direct sun, and a floor with no expansion gap at the walls peaks at the seams. Skipped acclimation and an unlevel slab are the other common causes. In rooms with big west-facing glass, glue-down is often the safer method.
- How much does LVP installation cost in the Inland Empire?
- Installed luxury vinyl plank runs $4 to $9 per square foot depending on the product, how much slab preparation is needed, and whether it is floated or glued. Stairs are priced separately.